Sep 23, 2026 · by Baptiste, founder of Vanpelt Studio
The talking head setup, by budget: what to buy and where to put it
Most bad-looking YouTube setups are not made of cheap gear. They are made of decent gear in the wrong place: a good light sat directly behind the camera, a good camera sat on a laptop below chin height, and a person sat with their back flat against a wall. The fix for all three costs nothing, and until you make it, spending money makes almost no difference.
So this is a shopping list in reverse. Each tier below says what to buy, where to physically put it, and the one problem it solves. One example runs through all of it: a spare bedroom with a desk pushed against the wall and a laptop on top, which is where most people actually start. By the end that room films properly, and you will have spent either nothing or about $800 depending on where you stop.
What each price tier actually buys
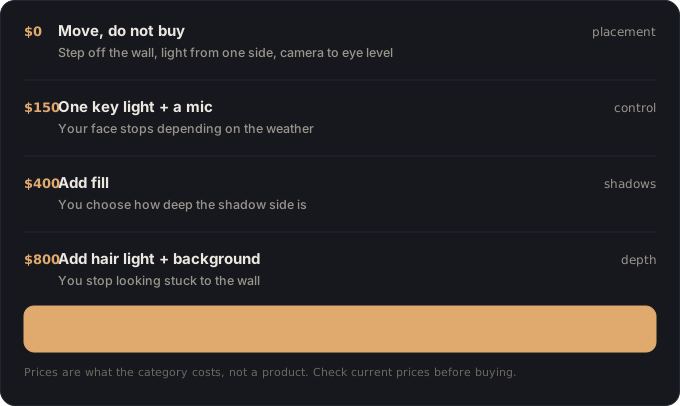
Step 1: make the three moves that cost nothing
Before buying anything, change three things about where you sit.
Pull the desk off the wall. In the spare bedroom the desk is against the wall, which puts your head about 30cm from it. Move it so you are at least 1.5m clear. This is the single biggest visual upgrade available for free: distance is what lets the background fall out of focus and stops your own shadow landing on the wall behind you.
Put the light off to one side. Not behind the camera, not overhead. Overhead is the worst of the three because ceiling lights drop shadows into your eye sockets and under your nose, which reads as tired no matter how you feel. Around 45 degrees off the camera axis is the target.
Raise the camera to eye level. A laptop on a desk sits well below your eyes and films up your nose. Books under it are a legitimate fix. The viewer cannot see the books.
The three free moves, before and after
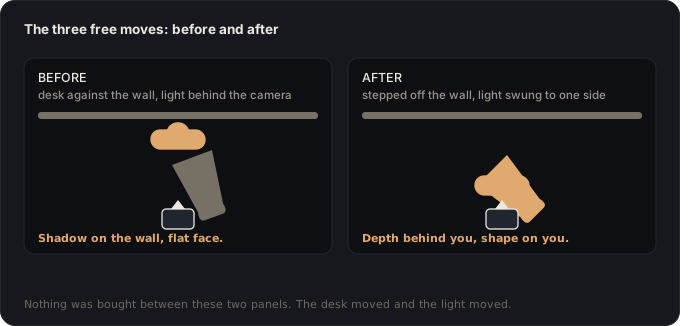
Output: the same room, the same gear, and a shot that no longer has the three obvious tells.
Step 2: the window setup ($0)
If you film during the day, you already own a large soft light. A window is physically big, which is exactly what makes light flattering: the larger the source relative to your face, the softer the shadow edge it casts.
Sit so the window is around 45 degrees to one side of the camera. The two failure modes are both common: a window behind you turns you into a silhouette, and a window directly behind the camera lights you flat from the front. Then turn the room lights off. Mixing daylight with a warm ceiling bulb gives you one orange side and one blue side of your face, and that colour clash is a tell that no amount of grading fixes cleanly.
Three window positions, and why mixing light sources fails
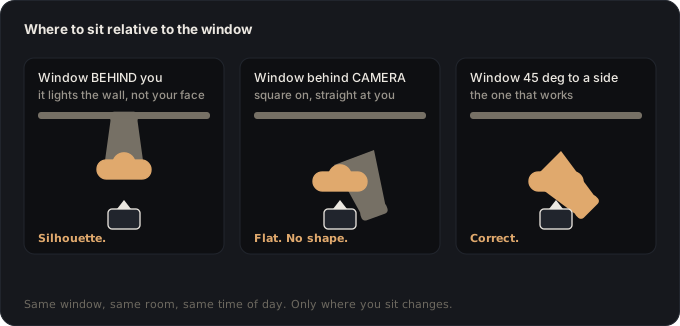
Output: a good-looking shot on sunny afternoons. The reason to keep reading is that this is not repeatable, and a setup you can rebuild identically tomorrow is worth more than a setup that is occasionally prettier.
Step 3: buy one light and a microphone (about $150)
The first purchase is not a camera. It is the two things that stop your video depending on the weather and the room.
One light, not a kit of three. A single key light at 45 degrees, slightly above eye level, is genuinely enough for most talking-head content. Put a softbox or diffuser on it: a bare LED panel is a small hard source and will give you a crisp shadow edge down the side of your nose. Budget around $60 to $120 for a panel with a diffuser, or a little more for an edge-lit desk panel if the light must live permanently on your desk.
Skip the ring light. A ring light sits on the camera axis, which fills in every shadow on your face at once. No shadows means no shape, and a flat face reads as amateur even when it is well exposed. The shadow side is the thing doing the work.
Why a microphone matters more than the camera
A microphone matters more than a camera. Viewers forgive a soft image and leave over bad sound. If you film at a desk, a USB microphone is the practical answer: a dynamic USB mic in the $60 to $80 range rejects far more room echo than a sensitive condenser does, which matters a lot in an untreated bedroom. Get it within a fist or two of your mouth and slightly off to the side, out of the path of your breath.
The key light angle, seen from above
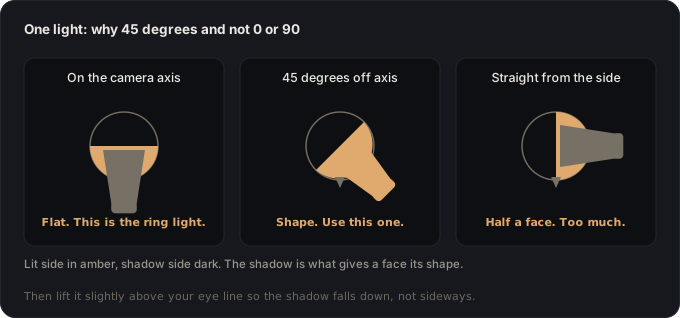
Output: a shot that looks the same on Tuesday as it did on Monday, which is what lets you batch-film.
Step 4: add fill, opposite the key (about $400)
With one light, the unlit side of your face falls off into shadow. Sometimes that is exactly right. When it is too heavy, the fix is a second light on the opposite side, around 60 to 90 degrees off the camera axis and running at 40 to 60 percent of the key.
The number is the important part. Fill is there to lift the shadow, not erase it. Run the second light at the same power as the first and you have rebuilt the ring light with extra steps: two sources, no shadow, no shape. If you want to spend nothing here, a white foam board propped opposite the key does the same job by bouncing your own key back at you, and it is genuinely hard to overdo.
The two-light setup, seen from above
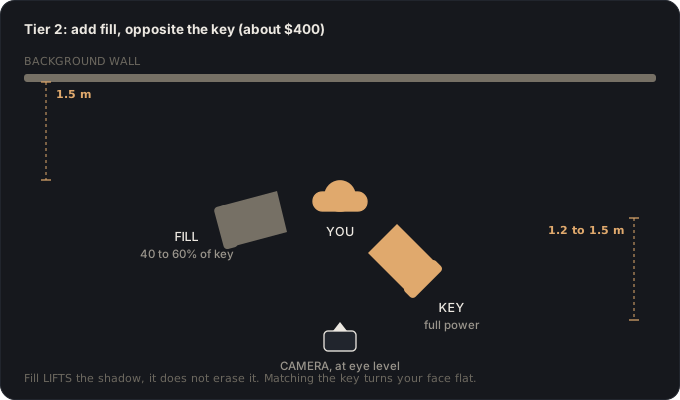
Output: you now choose how dramatic the shot is, instead of accepting whatever one light gives you.
Step 5: separate yourself from the background (about $800)
At this point you are lit and the background is not, so you read as a person stuck to a wall. Two additions fix it.
A hair light behind you, aimed at your head and shoulders from behind and slightly to one side, draws a thin bright edge along your shoulder and separates you from whatever is behind. This is the light that makes a spare bedroom read as a set, and it is the one most people never buy.
Something on the background itself. A lamp aimed at the wall, or a practical light in shot, gives the space depth. Set it a little warmer or cooler than your key so the background reads as a different plane rather than more of the same wall.
While you are here, put something with depth behind you: a shelf, a plant, a piece of furniture at a different distance. Depth is what separates amateur backgrounds from professional ones, and it comes from layers at different distances rather than from decoration.
The full four-light setup, seen from above
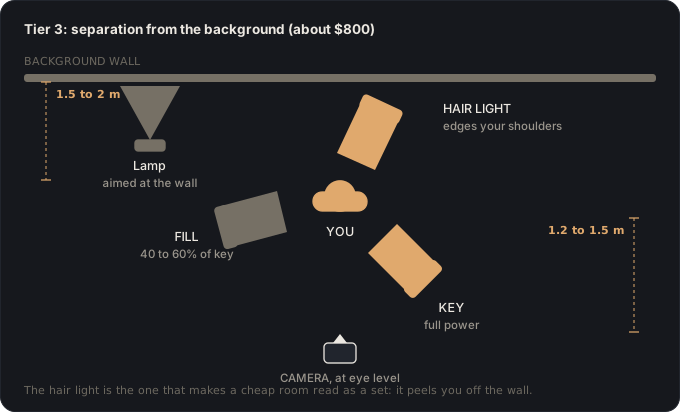
Output: a shot with three distinct planes (you, the midground, the wall) instead of one flat one.
Where the camera goes, and what it sees
Two things about the camera matter far more than which camera it is.
Height. Put the lens at eye level. Below it and you are filming up the nose. Well above it and angled down, you look small and slightly apologetic. This is the correction a floor plan cannot show you, which is why it gets skipped.
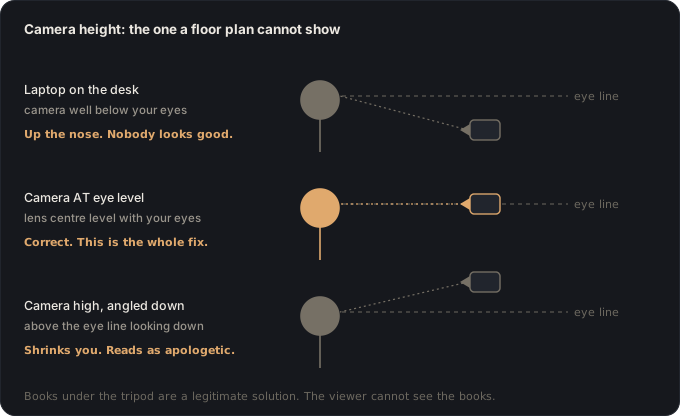
Framing: headroom, the upper third, and getting closer
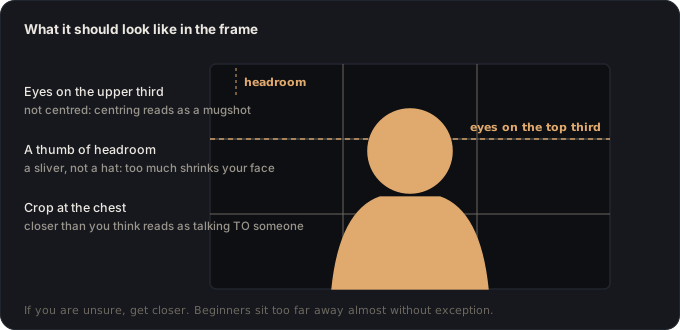
Framing. Put your eyes on the upper third line rather than in the centre of the frame, leave a thumb of headroom rather than a hat of it, and crop around the chest. Eyes on the upper third is the convention viewers are unconsciously used to, and centring your head instead reads like a passport photo.
Then get closer than feels natural. Sitting too far back is the most common framing error by a wide margin, and a tighter frame reads as talking to one person rather than presenting to a room.
Make a small room work
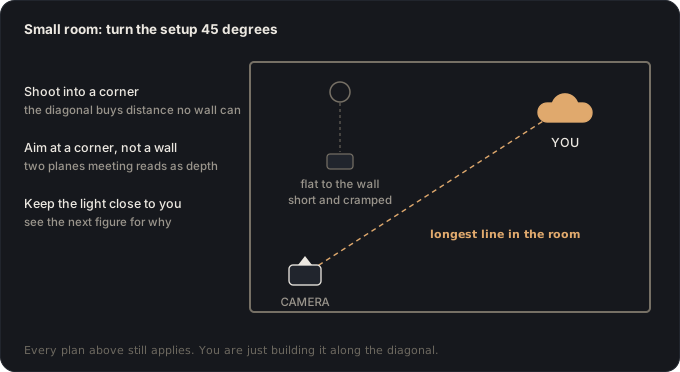
Every plan above quietly assumes about 3m of room: 1.5m behind you and a little over 1m in front. A box bedroom does not have that in a straight line. It does have it diagonally.
Turn the whole setup 45 degrees and shoot corner to corner. The diagonal is the longest line in any rectangular room, so putting the camera in a corner buys you distance no wall can. Aiming at a corner helps twice over: two walls meeting at an angle read as depth, where one flat wall reads as a backdrop.
Move the light closer: the inverse-square trick for small rooms
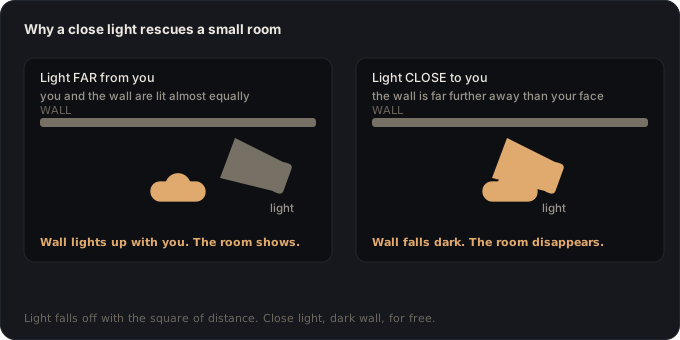
Then move the light closer to you. This is the one piece of physics worth knowing, and in a small room it does more than any purchase. Light falls off with the square of the distance, so a source close to your face is already much weaker by the time it reaches the wall a metre behind you. Your face stays bright, the wall goes dark, and a cramped room stops being visible. Move the same light back and your face and the wall get lit almost equally, which is what makes small-room footage look like a hostage video.
A black flag, and backing up instead of zooming in
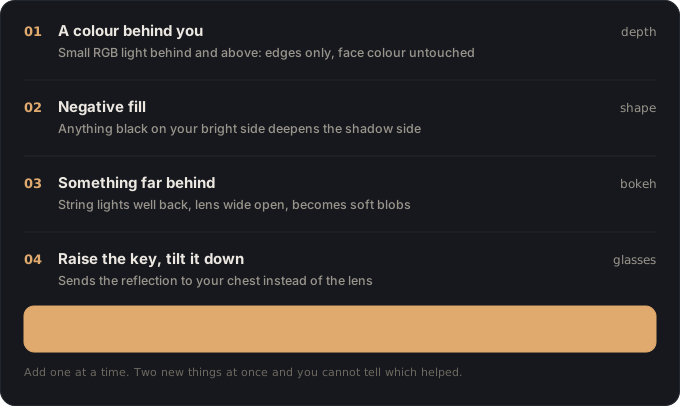
Add something black on your bright side. Small rooms with pale walls bounce your key straight back into the shadow side, so the room fills its own shadows and your face flattens out. A black flag, or any dark non-reflective thing propped just out of frame, takes that bounce away and gives the shape back. An open wardrobe door works. This costs nothing and is the most underrated fix on this page.
If you can back up at all, back up and zoom in. A wide lens up close shows the whole room behind you and stretches whatever is nearest the camera, usually your nose. A longer lens from further back shows a narrower slice of room and is kinder to faces. In a small room you will not get far, but even a step helps.
The extras that change the look
Once the key light, the camera height and the microphone are right, these are the things that actually change how a shot feels. Add one at a time: change two things at once and you will not know which one helped.
A colour behind you. A small RGB light placed behind and slightly above your head, set to something you are not wearing, edges your shoulders in colour without touching the colour of your face, because it only ever hits your outline. It is the cheapest way to make a plain wall look deliberate.
Something far behind you, out of focus. String lights, a lamp, anything small and bright, placed as far back as the room allows and shot with the lens wide open, melts into soft blobs. Distance is what does the work here, which is the same reason you stepped off the wall in step 1.
Glasses glare, and what to wear on camera
Glasses. If you wear them, you will see your key light reflected in the lens. The fix is geometric, not a purchase: keep the light off to the side at around 45 degrees, then raise it above your eye line and tilt it down, which sends the reflection down toward your chest instead of into the camera.
Watch what you wear. Avoid matching the wall behind you or you will merge into it, and avoid tight stripes, which can shimmer on camera.
The room is half your audio
A bedroom with bare walls, a wooden floor and a window is an echo chamber, and echo is the one problem you genuinely cannot fix afterwards. You can reduce noise, you can EQ a dull voice, but you cannot un-ring a room.
Small rooms are worse at this, and for a specific reason. Two hard parallel walls bounce sound back and forth between them, and in a small room that trapped energy sits in exactly the mid and high frequencies where the human voice lives. So the same room that is hard to light is also the one that rings.
The useful part is that you only need to break one side of each parallel pair, not both. Soften one wall and the bounce has nowhere to keep going. The cheap fixes are already in your house: a rug on a hard floor, curtains drawn, a duvet on the bed left unmade, a bookshelf on the wall behind the camera.
The clap test: how to check if a room rings
Clap once in the room and listen for the ring. Add soft things to one wall at a time until the clap sounds dead. That test costs nothing and tells you more than buying foam panels at random.
If it looks wrong, it is one of these
- Raccoon eyes and a shadow under the nose. Your main light is overhead. Move it to one side and lower it toward eye level.
- Flat, shapeless face. Your light is on the camera axis (usually a ring light), or your fill is as strong as your key. Move the key off-axis, or turn the fill down to roughly half.
- One side of your face orange, the other blue. You are mixing daylight and room bulbs. Turn one of them off.
- A hard shadow of your head on the wall. You are too close to the wall. Step forward, and raise the light so the shadow falls down and behind you.
- You look stuck to the background. Nothing is lighting the background and nothing is edging you. Add the hair light before you add anything else.
- The voice sounds distant and roomy. The microphone is too far away. Distance is the first thing to fix, before any purchase.
More fixes: eye glare, blending into the wall, and looking small
- Two bright discs where your eyes should be. Your key is too close to the camera axis and too low. Move it wider, raise it, tilt it down.
- You blend into the wall. Your top is the same colour as the background, or nothing is edging you. Change one of the two.
- You look small and slightly sad. The camera is above your eye line looking down.
The whole setup on one line
Sit 1.5m off the wall, put one soft light 45 degrees to one side and slightly above your eyes, put the camera at eye level with your eyes on the upper third, and get the microphone close. Everything after that is refinement.
If you want the other half of this, the part that decides whether the video is worth filming at all, start with what you need to say and shoot before you press record, and the lesson on lighting the face rather than the room.
Sources
- Neewer: talking head lighting setups for the fill placement (60 to 90 degrees off axis) and the 40 to 60 percent of key ratio.
- Fstoppers: how softbox size and distance affect your photos for why a larger source relative to the subject gives softer shadow edges.
- Wikipedia: headroom in photographic framing for the headroom convention.
- American Cinematographer: Shot Craft, the talking head for interview framing and eye line practice.
- That Toronto Studio: backgrounds for talking head videos for background depth coming from layers rather than decoration.
- Videomaker: shooting video in a small space for the corner-to-corner diagonal.
- Westcott: the inverse square law for why a close light lets the background fall dark.
- Neil Oseman: what is negative fill for using black to take away bounced light in a pale room.
Sources: sound, glare and colour, plus a note on prices
- Vicoustic: what is flutter echo for parallel walls trapping voice frequencies, and for treating only one surface of each pair.
- DIY Video Studio: avoiding glare on glasses for raising and tilting the key to move the reflection off the lens.
- Ulanzi: RGB lighting ideas for a colour behind the subject hitting only the edges.
Prices are what each category costs rather than a specific product, because named gear dates fast: one light recommended everywhere in 2026 guides has already been discontinued, and street prices for the same microphone currently range from about $50 to $110 depending on the retailer. Check the current price before buying anything named here.